
Smart Autocomplete Add-on (Experimental)
Oxygen XML Editor offers a Smart Autocomplete add-on that provides support for helping writers create content by providing text completions. This can be done by in two ways: by using a built-in algorithm, or by using a language model (provided by Open AI® 1).
Quick Installation
You can drag the following Install button and drop it into the main editor in Oxygen (version 24.1 or newer) to quickly initiate the installation process:

Manual Installation
- Go to to open an add-on selection dialog box. Enter or paste
https://www.oxygenxml.com/InstData/Addons/default/updateSite.xml in the
Show add-ons from field or select it from the drop-down
menu.Note: If you have issues connecting to the default update site, you can download the add-on package, unzip it, then use the Browse for local files action in the Install new add-ons dialog box to locate the downloaded addon.xml file.
- Select the Smart Autocomplete add-on and click Next.
- Read the end-user license agreement. Then select the I accept all terms of the end-user license agreement option and click Finish.
- Restart the application.
Result: The Smart Autocomplete side view should be now available.
Use Cases for the Built-in Algorithm
- Completions with existing project text.
- You can organize text in some of your project files as a kind of completion proposals library.
Use Cases for the Language Models
Technical content:
- Completions (note that it is very creative, but not always accurate, so you need to check the proposed content)
- Automatic markup
- Keywords extraction
- Summarizing
- Translation
- Brainstorming ideas
- Paraphrasing
- Copywriting
- Creating commercial ads.
Resources
For more information about the Smart Autocomplete add-on, watch our video demonstration:
UI Overview
- Built-in - Uses the built-in algorithm.
- Open AI - Uses the Open AI models.
- None - Disables the functionality.
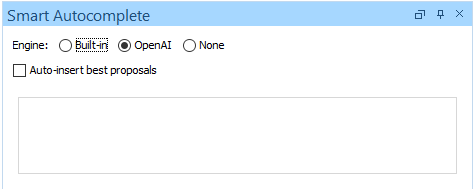
If you select the Auto-insert best proposals checkbox, the insertion of the text is done automatically. Deselecting this option allows you to choose from a list of proposals displayed in the view.
Using the Built-in Algorithm
The built-in algorithm analyzes the set of all XML, HTML, or Markdown files from your project and creates a local index. Once this is selected, you can initiate the indexing of project files by clicking the Reindex Project button. The same effect is obtained if you reindex the project files from the Open/Find Resources view. When you save one of the indexed files, this will be re-indexed incrementally.
- It is fast and works on your local computer.
- It generates content that you already have in the project.
- You can use it as a kind of text template library. The quality of the completions increase with the size of your text content in the project.
Disadvantages:
- The proposals are not creative.
- There is no semantic search.
Using the Open AI Models
Open AI GPT3 is the largest commercial AI model available to integrators. It contains about 175 billions weights, and it was trained on a huge corpus of text. Similar to other encoder/decoder language models, the training was done by 'hiding' some words from the input and asking the model to guess the missing word.
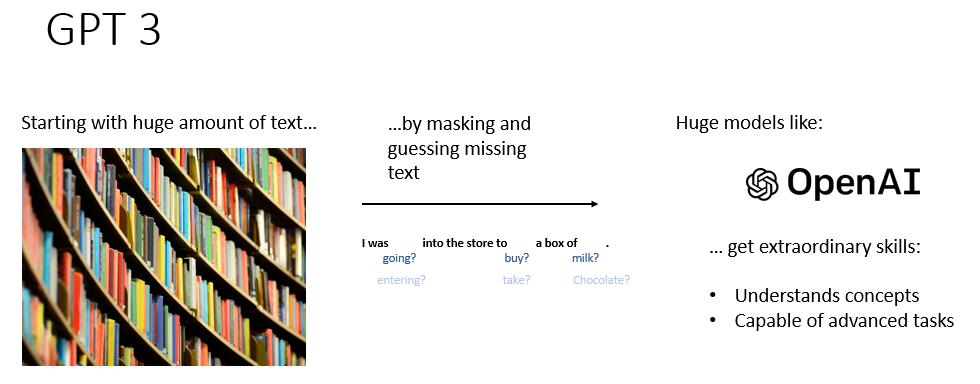
The resulting language model was able to find semantic connections between words, in some way 'understanding' the meaning of a window of text, while being capable of doing much more than it was trained to do initially (e.g. responding to questions).
Advantages of the Open AI GPT-3 Language Model:
- Semantic awareness
- Extensible
- ‘Creative’
- Slow due to network latency since content is sent to Open AI®
servers.Important: Check the license terms of the Open AI platform to make sure your company agrees with sending parts of the edited document to the Open AI.
- Not always factually correct since it uses probabilistic responses.Important: Always check the generated content. It behaves more like a brain than a database.
- The list of proposals.
- A panel with actions that can transform the selected text from the editor.
- A control panel with three tabs:
- Model - This drop-down allows you to select the Open AI model
you intend to use for providing completions. It can be one of the base models, or one
you fine-tuned (or trained) from your data. The default selection is
text-davinci-001.Note: The base models are named according to the following conventions (they contain one of the following keywords):davinci(signals the most capable model),curie,babbage, andada. - Fine-tune Jobs - From this tab, you can start fine-tuned jobs. Once a fine-tuned job has finished, the resulting model is listed in the Model combo box.
- API Key - This tab allows you to configure the Open AI API Key.
- Model - This drop-down allows you to select the Open AI model
you intend to use for providing completions. It can be one of the base models, or one
you fine-tuned (or trained) from your data. The default selection is
Installing the Open AI API Key
- Log in at https://beta.openai.com/overview.
- Click on your organization avatar, then choose View API Keys.
- Click + Create a new secret key.
- Copy the key to the clipboard.
- Paste the key into the API Key text field in the Smart Autocomplete view.
You can check that the add-on is connected to Open AI by switching to the
Model tab. If the combo box contains a list of model names, the
connection was successful. The default selected model is
text-davinci-001.
Getting Completions
To get completions while typing content, enter a space and wait for a few seconds. Typing more text cancels the completion request. You can try different models to see different results. You can also try to fine tune a model to get better completions.
Creating a Fine-Tuned Model
- Click the New Fine-tune Job button at the bottom of the view. A dialog box is displayed.
- In the resulting dialog box, you can choose to create a model starting from a base one (see the Base model combo box) that is trained over the text of XML, TXT, Markdown, or PDF files from the current project, from a specified folder, or from a file that contains a lot of "prompt"/"completion" examples in JSONL format. This file may be created by a tool (or manually) from the training results in better models.
- Click Start Fine tune job to start the job and it will be listed in the Fine-tune Jobs panel.
- To check the job progress, you can click the Refresh button (the
Status column will be updated). Another way is to use the
Job Events action from the contextual menu. Example of a list of
events:
Fri Feb 25 08:45:22 EET 2022	info	Created fine-tune: ft-jAeo6XJ3dyXF0mchWAD0wWFb
Fri Feb 25 08:45:30 EET 2022	info	Fine-tune costs $11.85
Fri Feb 25 08:45:30 EET 2022	info	Fine-tune enqueued. Queue number: 0
Fri Feb 25 08:45:34 EET 2022	info	Fine-tune started
Fri Feb 25 08:53:34 EET 2022	info	Completed epoch 1/4
Fri Feb 25 09:00:53 EET 2022	info	Completed epoch 2/4
Fri Feb 25 09:08:10 EET 2022	info	Completed epoch 3/4
Fri Feb 25 09:15:30 EET 2022	info	Completed epoch 4/4
Fri Feb 25 09:15:56 EET 2022	info	Uploaded model: curie:ft-syncro-soft-srl-2022-02-25-07-15-55
Fri Feb 25 09:16:00 EET 2022	info	Uploaded result file: file-Avrc2wpFB1LKFiR7PFKver4o
Fri Feb 25 09:16:00 EET 2022	info	Fine-tune succeeded
To cancel a job, use Cancel action from the contextual menu. - Once a job is finished, you can click Refresh in the Model tab and you will find the name of the new model in the combo box.
Using XSLT to Create an Open AI Training Set
Suppose you need to fine tune a model to learn to apply markup to your text.
{"prompt": "<prompt text>", "completion": "<sample of generated text>"}For more details about this format, see: https://beta.openai.com/docs/guides/fine-tuning/prepare-training-data.
- prompt
- Pure text without any markup.
- completion
- Text with serialized markup.
First, some constants are defined and then the root matching template that scans a folder that contains DITA topics is created:
  <!-- Method "text" because we generate JSON -->
  <xsl:output method="text" omit-xml-declaration="yes"/>

  <!-- Paragraphs that are smaller than this limit are processed. -->
  <xsl:variable name="limit" select="500"/>
  <!-- Open AI recommends adding terminators to the prompt and completion -->
  <xsl:variable name="prompt-terminator" select="' ### '"/>
  <xsl:variable name="completion-terminator" select="'$$$'"/>

  <xsl:template match="/">
      <xsl:for-each select="collection('file:/C:/path-to-topics-folder')">
        <xsl:call-template name="process-file"/>
      </xsl:for-each>
  </xsl:template>
Next, the template that processes each of the topic files is defined. Only the
<p> and <li> elements are selected in this
example, and for each of them, a prompt-completion pair is generated.
<xsl:template name="process-file"> <xsl:message>Processing <xsl:value-of select="document-uri(.)"/></xsl:message> <xsl:for-each select=".//*[contains(@class, ' topic/p ') or contains(@class, ' topic/li ')]"> <xsl:variable name="text" select="oxy:clean(.)"/> <xsl:variable name="text-with-markup"> <xsl:apply-templates mode="serialize-markup"/> </xsl:variable> <xsl:variable name="text-with-markup" select="oxy:clean($text-with-markup)"/> <xsl:if test="string-length($text)<$limit and string-length($text-with-markup)<$limit and string-length($text)>0 and string-length($text-with-markup)>0 and string-length($text) != string-length($text-with-markup) " xml:space="preserve"> {"prompt":"<xsl:value-of select="$text" disable-output-escaping="yes"/><xsl:value-of select="$prompt-terminator"/>", "completion":" <xsl:value-of select="$text-with-markup" disable-output-escaping="yes"/><xsl:value-of select="$completion-terminator"/>"}</xsl:if> </xsl:for-each> </xsl:template>
Since the format is JSON, the prompt and completion strings need to be cleaned up by escaping the quotes and apostrophes. This function is used from the above template.
  <xsl:function name="oxy:clean">
    <xsl:param name="txt"/>
    <xsl:variable name="apos">'</xsl:variable>
    <xsl:variable name="quot">"</xsl:variable>

    <xsl:variable name="txt">
      <xsl:value-of select="replace(normalize-space($txt), $quot, $apos)"/>
    </xsl:variable>
    <xsl:variable name="txt">
      <xsl:value-of select="replace($txt,'\\', '\\\\')"/>
    </xsl:variable>
    <xsl:sequence select="$txt"/>
  </xsl:function>
Next, to serialize the markup from a paragraph, all the inlines of interest are matched and the element names and attributes are emitted for each of them:
<!--
Match the inline elements and serializes them.
-->
<xsl:template match="*[
contains(@class, ' ui-d/uicontrol ') or
contains(@class, ' ui-d/menucascade ') or
contains(@class, ' ui-d/shortcut ') or
contains(@class, ' topic/i ') or
contains(@class, ' topic/b ') or
contains(@class, ' sw-d/filepath ') or
contains(@class, ' pr-d/codeph ') or
contains(@class, ' pr-d/codeblock ')
]" mode="serialize-markup" >
<!-- Only non empty elements. -->
<xsl:text><</xsl:text>
<xsl:value-of select="local-name()"/>
<xsl:for-each select="@*">
<xsl:if test="local-name() != 'class' and local-name() != 'id'">
<xsl:text> </xsl:text>
<xsl:value-of select="local-name()"/>
<xsl:text>='</xsl:text>
<xsl:value-of select="."/>
<xsl:text>'</xsl:text>
</xsl:if>
</xsl:for-each>
<xsl:text>></xsl:text>
<xsl:apply-templates mode="serialize-markup"/>
<xsl:text></</xsl:text>
<xsl:value-of select="local-name()"/>
<xsl:text>></xsl:text>
</xsl:template>
To apply this stylesheet, create an XSLT transformation scenario in Oxygen XML Editor. You can choose any well-formed XML file as the input (the stylesheet scans a folder using the collection function, so this input will be ignored) and specify the output file.
Actions for Text Refactoring
Under the list of proposals, there is a toolbar that shows a set of buttons you can use to alter or refactor the selected text from the editor. For example, to transform a paragraph into a list with the summary of ideas, you can select its text, then click the Ordered Lists button. The selection will be replaced with a new structured text.