Project View
The Project view is designed to assist you with organizing and managing related files grouped in the same XML project. The actions available in the contextual menu and on the toolbar associated to this panel allow you to create XML projects and provide shortcuts to various operations for the project documents.
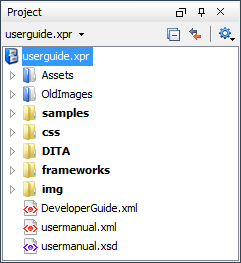
Figure: Project View
By default, the view is positioned on the left side of the Oxygen XML Developer window, above the Outline view. If the view has been closed, it can be reopened at any time from the menu (or using the Show Project View action from the Project menu).
 Open
Project (Ctrl + F2 (Command + F2
on OS X))
Open
Project (Ctrl + F2 (Command + F2
on OS X))- Opens an existing project. Alternatively, you can open a project by dropping an Oxygen XML Developer XPR project file from the file explorer into the
Project panel.Note: When a project is opened for the first time, a confirmation dialog box will be displayed that asks you to confirm that the project came from a trusted source. This is meant to help prevent potential security issues.
 New Project
- Creates a new, empty project.
 Collapse
All
Collapse
All- Collapses all project tree folders. You can also collapse/expand a project tree folder if you select it and press the Enter key or Left Arrow to collapse and Right Arrow to expand.
 Link with
Editor
Link with
Editor- When selected, the project tree highlights the currently edited file, if it is found in the project files.
 Settings
- A submenu that contains the following actions:
 Filters
- Allows you to filter the information displayed in the Project view. Click the toolbar button to set filter patterns for the files you want to show or hide. Also, you can set filter patterns for the linked directories that are hidden.
- Show Full Path
- When selected, linked files and folders are presented with a full file path.
- Enable Master Files Support
- Select this option to enable the Master Files support.
- Change Search and Refactor operations scope
- Allows you to change the collection of documents that define the context of
the search and refactor
operations.
- Use only Master Files, if enabled - Restricts Oxygen XML Developer to perform the search and refactor operations starting from the master files that are defined for the current resource. This option is available when you select Project in the Select the scope for Search and Refactor operations dialog box and the Master Files support is enabled.
- Working sets - Allows you to specify the set of files that will be used for the scope of the search and refactor operations.
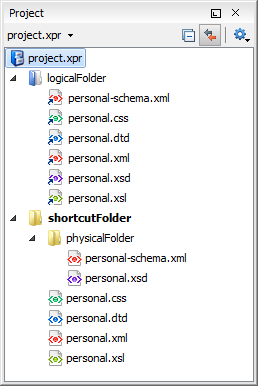
The files are usually organized in an XML project as a collection of folders. There are three types of resources displayed in the Project view:
- Logical folders - marked with a blue icon on
Windows and Unix/Linux (
 ) and a magenta
icon on Mac OS X (
) and a magenta
icon on Mac OS X ( ). They help you group
files within the project. This folder type has no correspondent on the physical disk, since
they are used as containers for related items. Creating and deleting them does not affect
the file system on disk. They are created on the project root or inside other logical
folders by using the contextual action . The contextual menu action
). They help you group
files within the project. This folder type has no correspondent on the physical disk, since
they are used as containers for related items. Creating and deleting them does not affect
the file system on disk. They are created on the project root or inside other logical
folders by using the contextual action . The contextual menu action  Remove from
Project can be used to remove them from the project.
Remove from
Project can be used to remove them from the project. - Physical folders and files - marked with the operating system-specific icon for
folders (usually a yellow icon on Windows and a blue icon on Mac OS X). These folders and
files are mirrors of real folders or files that exist in the local file system. They are
created or added to the project by using contextual menu actions (such as , , Add Folder, etc.) Also, the contextual menu
action
 Remove from
Disk (Shift+Delete) can be used to remove them from the
project and local file system.
Remove from
Disk (Shift+Delete) can be used to remove them from the
project and local file system. - Shortcut folders and files - the icons for
file shortcuts include a shortcut symbol and names of folder shortcuts are displayed in
bold text. All files and folders that appear as direct descendants
of a logical folder are considered shortcuts. They are created and added with the
contextual actions Add Files and Add Folder
from the project root. Both contextual menu actions Remove from
Project and Remove from Disk
(Shift+Delete) are available for shortcuts.
Remove
from Project just removes the shortcut from the project, while
Remove from
Disk (Shift+Delete) removes the shortcut and the
physical resource from the local file system.
Figure: Project View with Examples of all Three Types of Resources
Creating New Projects
- New Project
- Creates a new, empty project.
Creating New Project Items
- New >
 File
File - Opens a New file dialog box that helps you create a new file and adds it to the project structure.
- New >
 Folder
 - Opens a New Folder dialog box that allows you to specify a name for a new folder and adds it to the structure of the project.
- New >
Logical Folder
- Available when invoked from the project root, this action creates a logical
folder in the tree structure (the icon is a magenta folder on Mac OS X - ).
- Available when invoked from the project root, this action replicates the structure of a remote folder accessible over FTP/SFTP/WebDAV, as a structure of logical folders. The newly created logical folders contain the file structure of the folder it points to.
Managing Physical Folders and Files
You can create physical folders by selecting from the contextual menu.
When adding files to a project, the default target is the project root. To change a target, select a new folder. Files may have multiple instances within the folder system, but cannot appear twice within the same folder.
Remove from
Project. To remove a linked file or folder from both project and local file
system, select the contextual menu action Remove from Disk
(Shift+Delete). The Remove from Disk
(Shift+Delete) action is also used to remove physical
files or folders.You can move the resources of the project with drag and drop operations on the files and folders of the tree (the Enable drag-and-drop in Project view option must be selected in the View preferences page).
You can also use the usual  Cut,
Cut,  Copy, and
 Paste
actions to move resources in the Project view.
Paste
actions to move resources in the Project view.
- Invoke the Rename action from the contextual menu.
- Press F2 and type the new name.
- Click the selected item and type the new name.
To finish editing the item name, press Enter.
If a project folder contains a lot of documents, a certain document can be located quickly in the project tree by selecting the folder containing the desired document and typing the first few characters of the document name. The desired document is automatically selected as soon as the typed characters uniquely identify its name in the folder.
The selected document can be opened by pressing the Enter key, by double-clicking it, or with one of the Open actions from the contextual menu. The files with known document types are opened in the associated editor, while binary files are opened with the associated system application. To open a file with a known document type in an editor other than the default one, use the Open with action. Also, dragging and dropping files from the project tree to the editor area results in the files being opened.
The project file is automatically saved every time the content of the Project view is saved or modified by actions such as adding or removing files and drag and drop.
Linked Folders
You can create linked folders (shortcuts) by dragging and dropping folders from a system explorer to the project tree (the Enable drag-and-drop in Project view option must be selected in the Views preferences page), or by selecting Add Folder in the contextual menu from the project root.
File action from the contextual menu. This opens the New Document
wizard.Logical Folders
 Add Folder
- Adds a link to a physical folder, whose name and content mirror a real folder that
exists in the local file system (the icon of this action is different on Mac OS X
 ).
).  Add
Files
Add
Files- Adds links to files on the local file system.
 Add
Edited File
Add
Edited File- Adds a link to the currently edited file in the project.
Validate Files
The currently selected files in the Project view can be checked to be XML well-formed or validated against a schema (DTD, XML Schema, Relax NG, Schematron or NVDL) with one of the following contextual menu actions found in the Validate submenu:
 Check
Well-Formedness
Check
Well-Formedness- Checks if the selected file or files are well-formed.
 Validate
- Validates the selected file or files against their associated schema. EPUB files make an exception, because this action triggers a Validate and Check for Completeness operation.
- Validate with Schema
- Validates the selected file of files against a specified schema.
 Configure Validation Scenario(s)
- Allows you to configure and run a validation scenario.
Applying Transformation Scenarios
 Apply
Transformation Scenario(s)
Apply
Transformation Scenario(s)- Obtains the output with one of the built-in scenarios.
 Configure Transformation Scenario(s)
- Opens a dialog box that allows you to configure pre-defined transformation scenarios.
-
Transform with
- Allows you to select a transformation scenario to be applied to the currently selected files.
Refactoring Actions (Available for certain document types (such as XML, XSD, and XSL)
Oxygen XML Developer includes some refactoring operations that help you manage the structure of your documents. The following actions are available from the contextual menu in the Refactoring submenu:
- Rename resource
- Allows you to change the name of a resource.
- Move resource
- Allows you to change the location on disk of a resource.
 XML
Refactoring
XML
Refactoring- Opens the XML Refactoring tool wizard that presents refactoring operations to assist you with managing the structure of your XML documents.
- Other XML Refactoring Actions
- For your convenience, the last 5 XML Refactoring tool operations that were finished or previewed will also appear in this submenu.
Other Contextual Menu Actions
- Open
- Opens the selected files in the corresponding editor.
- Open with submenu
- This submenu allows you to open the selected file with the internal editor, a system application, or other internal tools: Archive Browser, Generate/Convert Schema, WSDL/SOAP Analyzer, Large File Viewer, Hex Viewer, SVG Viewer.
- Show in Explorer (or Show in Finder on OS X)
- In Windows, the content of the selected folder or file is presented in a specific explorer window. On MAC OS X, the parent folder is opened and the selected folder is highlighted in a specific finder window.
- Copy Location
- Copies an application-specific URL for the selected resource to the clipboard.
 Refresh
- Refreshes the content and the dependencies between the resources in the Master Files directory.
 Find/Replace in Files
- Opens the Find/Replace in Files dialog box that allows you to find and replace text in multiple files.
 XPath in
Files
XPath in
Files- Opens the XPath/XQuery Builder view that allows you to compose XPath and XQuery expressions and execute them over the currently edited XML document.
 Open/Find
Resource
Open/Find
Resource- Opens the Open/Find Resource dialog box.
 Check
Spelling in Files
Check
Spelling in Files- Allows you to check the spelling of multiple files.
 Format and
Indent Files
Format and
Indent Files- Opens the Format and Indent Files dialog box that allows you to configure the format and indent (pretty-print) action that will be applied on the selected documents.
 Open in
SVN Client
Open in
SVN Client- Syncro SVN Client tool is opened and it highlights the selected resource in its corresponding working copy.
- Compare
- Allows you to compare multiple files or directories and the order of your selection
determines where they are opened in the Compare
Files or Compare
Directories tool. If you select two files or folders, your
first selection will be opened in the left panel and the other one in the right
panel.
You can also select 3 files and the tool will automatically be opened in the three-way comparison mode. If you select three files, your first selection will be opened in the left panel, the second in the right panel, and the third selection will be the base (ancestor) file.
- Opens the XML Schema Documentation Dialog Box.
- Opens the XSLT Stylesheet Documentation Dialog Box.
- Opens the XQuery Documentation Dialog Box.
- Opens the WSDL Documentation Dialog Box.
 Properties
- Displays the properties of the current file in a Properties dialog box.
Menu Level Actions
- New Project
- Creates a new, empty project.
- Open
Project (Ctrl + F2 (Command + F2
on OS X))
- Opens an existing project. Alternatively, you can open a project by dropping an Oxygen XML Developer XPR project file from the file explorer into the
Project panel.Note: When a project is opened for the first time, a confirmation dialog box will be displayed that asks you to confirm that the project came from a trusted source. This is meant to help prevent potential security issues.
- Save Project As
- Allows you to save the current project under a different name.
 Validate
all project files
Validate
all project files- Checks if the project files are well-formed and their mark-up conforms with the specified DTD, XML Schema, or Relax NG schema rules. It returns an error list in the message panel.
-
Filters
- Opens the Project filters dialog box that allows you to decide which files and directories will be shown or hidden.
- Enable Master Files Support
- Allows you to enable the Master Files Support for each project you are working on.
 Change Search and Refactor operations scope
- Opens a dialog box that allows you to define the context of search and refactor operations.
- Show Project View
- Displays the Project view.
- Reopen Project
- Contains a list of links of previously used projects. This list can be emptied by invoking the Clear history action.