DITA Maps Manager
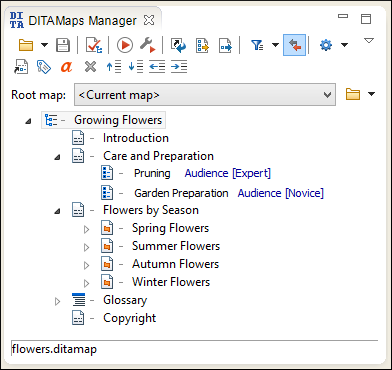
Oxygen XML Editor plugin provides a view for managing and editing DITA maps. The DITA Maps Manager view presents a DITA map as a Table of Contents. It allows you to navigate the topics and maps, make changes, and apply transformation scenarios to obtain various output formats. By default, it is located to the left of the main editor. If the view is not displayed, it can be opened by selecting it from the menu.
The DITA Maps Manager includes a variety of useful actions to help you edit and organize the structure of your DITA maps and topics. The actions that are available and their functions depend on the type of nodes that are selected in the DITA Maps Manager. If you select multiple sibling nodes, the result of the actions will be applied to all the selected nodes. If you select multiple nodes that are not on the same hierarchical level, the actions will be applied to the parent node and the child nodes will inherit certain attributes from the parent node.
Figure: DITA Maps Manager View
Opening Maps in the DITA Maps Manager
- To open a submap in its own tab, simply double-click it (or right-click it and select Open).
- Right-click a map file in the Navigator view and select Open in DITA Maps Manager.
If your map references other DITA maps, they will be shown, expanded, in the DITA Maps Manager view and you will be able to navigate their content. To edit the submaps and their content, you need to open each referenced map separately.
Drag and Drop in the DITA Maps Manager
You can move topics or nodes within the same map, or other maps, by dragging and dropping them into the desired position. You can arrange the nodes by dragging and dropping one or more nodes at a time. You can arrange multiple topics by dragging them while pressing the Ctrl or Shift key. Drop operations can be performed before, after, or as child of the targeted node.
Drag and drop operations include:
- Copy
- Select the nodes you want to copy and start dragging them. Before dropping them in
the appropriate place, press and hold the
Ctrl key. The mouse pointer changes to a
 symbol to indicate that a copy operation is
being performed.
symbol to indicate that a copy operation is
being performed. - Move
- Select the nodes you want to move and drag and drop them in the appropriate place.
- Promote (Ctrl + Alt + LeftArrow (Command + Alt + LeftArrow on OS X))/Demote (Ctrl + Alt + RightArrow (Command + Alt + RightArrow on OS X))
- You can move nodes between child and parent nodes by using the Promote (Ctrl + Alt + LeftArrow (Command + Alt + LeftArrow on OS X)) and Demote (Ctrl + Alt + RightArrow (Command + Alt + RightArrow on OS X)) operations.
DITA Maps Manager Toolbar
 Open Drop-down Menu
- You can use this drop-down menu to open new DITA maps or to reopen
recently viewed maps. The drop-down menu contains the following:
- List of recently viewed DITA maps that can be selected to reopen them.
- Clear history - Clears the history list of the recently viewed DITA maps.
 Open - Allows you to open the map in the DITA Maps Manager
view. You can also open a map by dragging it from the file system
explorer and dropping it into the DITA Maps Manager view.
Open - Allows you to open the map in the DITA Maps Manager
view. You can also open a map by dragging it from the file system
explorer and dropping it into the DITA Maps Manager view. Browse
workspace - Opens a file browser dialog box allowing you to select a
file from the local workspace.
Browse
workspace - Opens a file browser dialog box allowing you to select a
file from the local workspace. Open
URL - Displays the Choose DITA
Map dialog box that allows you to access any resource identified
through a URL (defined by a protocol, host, resource path, and an optional port).
The following actions are available in this drop-down menu:
Open
URL - Displays the Choose DITA
Map dialog box that allows you to access any resource identified
through a URL (defined by a protocol, host, resource path, and an optional port).
The following actions are available in this drop-down menu:- Browse
for local file - Opens a local file browser dialog box, allowing
you to select a local DITA map.
- Browse
workspace - Opens a file browser dialog box allowing you to
select a file from the local workspace.
- Browse
for remote file - Displays the Open using
FTP/SFTP dialog box that allows you to open a remotely
stored DITA map.
 Browse for archived file - Displays the Archive
Browser that allows you to browse the content of an
archive and choose a DITA map.
Browse for archived file - Displays the Archive
Browser that allows you to browse the content of an
archive and choose a DITA map. Browse Data Source
Explorer - Opens the Data Source Explorer that allows you to
browse the data sources defined in the Data Sources
preferences page.Tip: You can open the Data Sources preferences page by using the Configure Database Sources shortcut from the Open URL dialog box.
Browse Data Source
Explorer - Opens the Data Source Explorer that allows you to
browse the data sources defined in the Data Sources
preferences page.Tip: You can open the Data Sources preferences page by using the Configure Database Sources shortcut from the Open URL dialog box. Search for file - Displays the Find Resource
dialog box that allows you to search for a DITA map.
Search for file - Displays the Find Resource
dialog box that allows you to search for a DITA map.
 Save
(Ctrl (Meta on Mac OS)+S)
Save
(Ctrl (Meta on Mac OS)+S)- Saves the current DITA map.
 Validate and Check for Completeness
- Checks the validity and integrity of the map.
 Apply Transformation Scenario(s)
- Applies the DITA Map transformation scenario that is associated with the current map.
 Configure Transformation Scenario(s)
- Opens the Configure Transformation Scenarios(s) dialog box where you can edit or create transformation scenarios or associate a DITA Map transformation scenario with the current map.
 Refresh References
- You can use this action to manually trigger a refresh and update of all referenced documents. This action is useful when the referenced documents are modified externally. When they are modified and saved from Oxygen XML Editor plugin, the DITA map is updated automatically.
 Open Map in Editor with Resolved Topics
- Opens the DITA map in the main editor area with content from all topic
references, expanded in-place. Content from the referenced topics is presented as
read-only and you have to use the contextual menu action Edit Reference to open
the topic for editing. Tip: If you want to print the expanded content, you should consider changing the Styles drop-down to + Print ready.
 Open
Map in Editor
Open
Map in Editor- For complex operations that cannot be performed in the simplified DITA
Maps Manager view (for instance, editing a relationship table) you can
open the map in the main editing area. Note: You can also use this action to open referenced DITA maps in the Editor.
 Profiling/Conditional Text Drop-down Menu
- This drop-down menu contains the following actions:
- Show Profiling Colors and Styles - Select this option to turn on conditional styling. To configure the colors and styles open the Preferences dialog box and go to .
- Show Profiling Attributes - Select this option to display the values of the profiling attributes at the end of the titles of topic references. When selected, the values of the profiling attributes are displayed in both the DITA Maps Manager view and in the Author view.
- Show Excluded Content - Controls if the content filtered out by a particular condition set is hidden or grayed-out in the editor area and in the Outline and DITA Maps Manager views. When this option is selected, the content filtered by the currently applied condition set is grayed-out. To show only the content that matches the currently applied condition set, deselect this option.
 Profiling
Settings - Opens the preferences page for adding and editing the
profiling conditions that you can apply in the DITA Maps
Manager view and the Author mode editing
pane. When a profiling condition set is applied, the keys that are defined in the
DITA map are gathered by filtering out the excluded content.
Profiling
Settings - Opens the preferences page for adding and editing the
profiling conditions that you can apply in the DITA Maps
Manager view and the Author mode editing
pane. When a profiling condition set is applied, the keys that are defined in the
DITA map are gathered by filtering out the excluded content.
 Link
with Editor
Link
with Editor- Toggles the synchronization between the file path of the current editor and the selected topic reference in the DITA Maps Manager view.
 Settings
-
- Show extended toolbar
- Toggles whether or not the extended toolbar will be displayed in the DITA Maps Manager toolbar.
- Show root map toolbar
- Toggles whether or not the Root map option will be displayed in the DITA Maps Manager toolbar.
- Show topic titles
- Toggles how topics are presented in the DITA Maps
Manager. If selected, the title of each topic is shown.
Otherwise, the file path (value of the
hrefattribute) for each topic is shown.
- Root map
- Specifies a master DITA map (root map) that Oxygen XML Editor plugin uses to define a hierarchical structures of submaps and to establish a key space that defines the keys that are propagated throughout the entire map structure. For more information, see Selecting a Root Map.
-
Browse Drop-down menu
- You can use this drop-down menu to browse for root maps with the
following choices:
- Browse for
local file - Opens a local file browser dialog box, allowing you to
select a local root map.
- Browse
workspace - Allows you to select a root map from the
local workspace.
- Browse for
remote file - Displays the Open using FTP/SFTP
dialog box that allows you to select a remotely stored root
map.
- Browse
for archived file - Displays the Archive
Browser that allows you to browse the content of an archive
and choose a root map.
- Browse Data Source Explorer - Opens the
Data Source Explorer that allows you to browse
the data sources defined in the Data Sources
preferences page.Tip: You can open the Data Sources preferences page by using the Configure Database Sources shortcut from the Open URL dialog box.
- Search for file - Displays the Find
Resource dialog box to search for a root
map.
 Insert Topic
Reference
Insert Topic
Reference- Opens the Insert Reference dialog box that allows you to insert references to targets such as topics, maps, topic sets, or key definitions.
 Edit Properties
- Opens the Edit Properties dialog box that allows you to configure the properties of a selected node. For more details about this dialog box, see Edit Properties Dialog Box.
 Edit
Attributes
Edit
Attributes- Opens a small in-place editor that allows you to edit the attributes of a selected node. You can find more details about this action in the Attributes View in Author Mode topic.
 Delete
- Deletes the selected node.
 Move
Up
Move
Up- Moves the selected node up within the DITA map tree.
 Move
Down
Move
Down- Moves the selected node down within the DITA map tree.
 Promote
- Moves the selected node up one level to the level of its parent node.
 Demote
- Moves the selected node down one level to the level of its child nodes.
Contextual Menu of the DITA Maps Manager
- Root Map
- The following actions can be invoked from the contextual menu on the root map of an opened DITA
map:
- Open Map in Editor
- For complex operations that cannot be performed in the simplified DITA Maps Manager view (for instance, editing a relationship table) you can open the map in the main editing area.
- Open Map in Editor with Resolved
Topics
- Opens the DITA map in the main editor area with content from all topic references, expanded in-place. Content from the referenced topics is presented as read-only and you have to use the contextual menu action Edit Reference to open the topic for editing.
- Export DITA Map
- Allows you to choose a destination for exporting the DITA map.
- Find Unreferenced Resources
- Allows you to search for orphaned resources that are not referenced in the DITA maps.
- Edit Properties
- Opens the Edit Properties dialog box that allows you to configure the properties of a selected node. For more details about this dialog box, see Edit Properties Dialog Box.
- Fast Create Topics
- Opens the Fast Create Topics dialog box that allows you to quickly create multiple skeleton topics at once and you can specify their hierarchical structure within the DITA map.
- Append Child submenu
- Container sub-menu for a number of actions that create a map node as a child of the
currently selected node:
- New - Opens a dialog box that allows you to configure some options for inserting a new topic.
 Reference - Inserts a reference to a topic file. You can find more
details about this action in the Inserting References topic.
Reference - Inserts a reference to a topic file. You can find more
details about this action in the Inserting References topic.- Reference to the currently edited file - Inserts a reference to the currently edited file. You can find more details about this action in the Inserting References topic.
- Key Reference - Opens an Insert Key Definition dialog box that allows you to insert a key reference.
- Key Reference with Keyword - Opens a simplified Insert Key Definition dialog box that allows you to define a key and a value inside a keyword.
- A set of actions that open the Insert Reference dialog box that allow you to insert various reference specializations (such as Anchor Reference, Glossary Reference, Map Reference, Navigation Reference, Topic Group, Topic Head, Topic Reference, Topic Set, Topic Set Reference).
 Search References
- Searches all references to the current topic in the entire DITA map.
- Refactoring submenu
- The following actions are available from this submenu:
- Convert Markdown to DITA Topic (Available for Markdown documents)
- Opens a dialog box that allows you to configure options for converting the Markdown document into a DITA topic.
- Rename resource
- Allows you to change the name of a resource linked in the edited DITA map.
- Move resource
- Allows you to change the location on disk of a resource linked in the edited DITA map.
 XML Refactoring
- Opens the XML Refactoring tool wizard that presents refactoring operations to assist you with managing the structure of your XML documents.
- Other XML Refactoring Actions
- For your convenience, the last 5 XML Refactoring tool operations that were finished or previewed will also appear in this submenu.
 Check
Spelling in Files
Check
Spelling in Files- Allows you to spell check multiple files.
 Paste
Paste- Allows you to paste content from the clipboard into the DITA map.
- Paste Before
- Pastes the content of the clipboard (only if it is a part of the DITA map) before the currently selected DITA map node.
- Paste After
- Pastes the content of the clipboard (only if it is a part of the DITA map) after the currently selected DITA map node.
 Expand All
- Allows you to expand the entire DITA map structure.
 Collapse
All
Collapse
All- Allows you to collapse the entire DITA map structure.
- Child Nodes
- The following actions are available when the contextual menu is invoked on a child
node of a DITA map (submaps need to be opened in the DITA Maps
Manager to access these actions since they are in a read-only state in
the parent map):Note: If multiple nodes are selected, the availability of the actions depends on the nodes that are selected.
- Open
- Opens in the editor the resources referenced by the nodes that you select.
- Edit Properties
- Opens the Edit Properties dialog box that allows you to configure the properties of a selected node. For more details about this dialog box, see Edit Properties Dialog Box.
- Fast Create Topics
- Opens the Fast Create Topics dialog box that allows you to quickly create multiple skeleton topics at once and you can specify their hierarchical structure within the DITA map.
- Append Child submenu
- Container sub-menu for a number of actions that create a map node as a child of the
currently selected node:
- New - Opens a dialog box that allows you to configure some options for inserting a new topic.
- Reference - Inserts a reference to a topic file. You can find more
details about this action in the Inserting References topic.
- Reference to the currently edited file - Inserts a reference to the currently edited file. You can find more details about this action in the Inserting References topic.
- Key Reference - Opens an Insert Key Definition dialog box that allows you to insert a key reference.
- Key Reference with Keyword - Opens a simplified Insert Key Definition dialog box that allows you to define a key and a value inside a keyword.
- A set of actions that open the Insert Reference dialog box that allow you to insert various reference specializations (such as Anchor Reference, Glossary Reference, Map Reference, Navigation Reference, Topic Group, Topic Head, Topic Reference, Topic Set, Topic Set Reference).
- Insert Before submenu
- Container sub-menus for a number of actions that create a map node as a
sibling of the currently selected node, above the current node in the map:
- New - Opens a dialog box that allows you to configure some options for inserting a new topic.
- Reference - Inserts a reference to a topic file. You can find more
details about this action in the Inserting References topic.
- Reference to the currently edited file - Inserts a reference to the currently edited file. You can find more details about this action in the Inserting References topic.
- Key Reference - Opens an Insert Key Definition dialog box that allows you to insert a key reference.
- Key Reference with Keyword - Opens a simplified Insert Key Definition dialog box that allows you to define a key and a value inside a keyword.
- A set of actions that open the Insert Reference dialog box that allow you to insert various reference specializations (such as Anchor Reference, Glossary Reference, Map Reference, Navigation Reference, Topic Group, Topic Head, Topic Reference, Topic Set, Topic Set Reference).
- Insert After submenu
- Container sub-menus for a number of actions that create a map node as a
sibling of the currently selected node, below the current node in the map:
- New - Opens a dialog box that allows you to configure some options for inserting a new topic.
- Reference - Inserts a reference to a topic file. You can find more
details about this action in the Inserting References topic.
- Reference to the currently edited file - Inserts a reference to the currently edited file. You can find more details about this action in the Inserting References topic.
- Key Reference - Opens an Insert Key Definition dialog box that allows you to insert a key reference.
- Key Reference with Keyword - Opens a simplified Insert Key Definition dialog box that allows you to define a key and a value inside a keyword.
- A set of actions that open the Insert Reference dialog box that allow you to insert various reference specializations (such as Anchor Reference, Glossary Reference, Map Reference, Navigation Reference, Topic Group, Topic Head, Topic Reference, Topic Set, Topic Set Reference).
-
Search References
- Searches all references to the current topic in the entire DITA map.
- Refactoring submenu
- The following actions are available from this submenu:
- Convert Markdown to DITA Topic (Available for Markdown documents)
- Opens a dialog box that allows you to configure options for converting the Markdown document into a DITA topic.
- Rename resource
- Allows you to change the name of a resource linked in the edited DITA map.
- Move resource
- Allows you to change the location on disk of a resource linked in the edited DITA map.
- XML Refactoring
- Opens the XML Refactoring tool wizard that presents refactoring operations to assist you with managing the structure of your XML documents.
- Other XML Refactoring Actions
- For your convenience, the last 5 XML Refactoring tool operations that were finished or previewed will also appear in this submenu.
- Check
Spelling in Files
- Allows you to spell check multiple files.
 Cut
Cut
- Deletes the currently selected node and copies it to the clipboard.
 Copy
Copy- Copies the currently selected node to the clipboard.
-
Paste
- Allows you to paste content from the clipboard into the DITA map.
- Paste Before
- Pastes the content of the clipboard (only if it is a part of the DITA map) before the currently selected DITA map node.
- Paste After
- Pastes the content of the clipboard (only if it is a part of the DITA map) after the currently selected DITA map node.
-
Delete
- Deletes the currently selected node from the DITA map.
- Organize
- Allows you to organize the DITA map with the several submenu
actions:
-
Move Up - Moves the selected node up within the DITA
map tree.
-
Move Down - Moves the selected node down within the
DITA map tree.
- Promote - Moves
the selected node up one level to the level of its parent node.
-
Demote - Moves
the selected node down one level to the level of its child nodes.
- Expand All
- Allows you to expand the entire DITA map structure.
- Collapse
All
- Allows you to collapse the entire DITA map structure.
- Other Nodes
- The following actions are available when the contextual menu is invoked from a map node that is not an immediate
child node of the root map or
other special nodes (such as relationship tables):Note: If multiple nodes are selected, the availability of the actions depends on the nodes that are selected.
- Open
- Opens in the editor the resources referenced by the nodes that you select.
- Open Map in Editor (available when invoking on a submap)
- Opens the currently selected DITA map in the editor.
- Open parent DITA map (available when invoking on a topic reference or a submap reference)
- Opens the parent DITA map of the currently selected reference in the DITA Maps Manager.
- Edit
Attributes (only available for relationship table nodes)
- Opens a small in-place editor that allows you to edit the attributes of a selected node. You can find more details about this action in the Attributes View in Author Mode topic.
- Edit Profiling Attributes (only available for relationship table nodes)
- Allows you to change the profiling attributes defined on the selected node.
-
Search References
- Searches all references to the current topic in the entire DITA map.
- Refactoring submenu
- The following actions are available from this submenu:
- Convert Markdown to DITA Topic (Available for Markdown documents)
- Opens a dialog box that allows you to configure options for converting the Markdown document into a DITA topic.
- Rename resource
- Allows you to change the name of a resource linked in the edited DITA map.
- Move resource
- Allows you to change the location on disk of a resource linked in the edited DITA map.
- XML Refactoring
- Opens the XML Refactoring tool wizard that presents refactoring operations to assist you with managing the structure of your XML documents.
- Other XML Refactoring Actions
- For your convenience, the last 5 XML Refactoring tool operations that were finished or previewed will also appear in this submenu.
- Check
Spelling in Files
- Allows you to spell check multiple files.
-
Copy
- Copies the currently selected node to the clipboard.
- Expand All
- Allows you to expand the entire DITA map structure.
- Collapse
All
- Allows you to collapse the entire DITA map structure.
To watch our video demonstration about the DITA Maps Manager view, go to https://www.oxygenxml.com/demo/DITA_Maps_Manager.html.