Adding Images in DITA TopicsEdit online
There are several ways to add images to a DITA topic, depending on if you want to create a figure element (with a title and caption), just insert an image inline, or if you want to use multiple versions of a graphic depending on the situation. For instance, you might want to use a specific image for each different product version or output media.
Adding an Image Inline with the Insert Image Dialog Box
Use the following procedure to add an image inline:
- Place the cursor in the position you want the graphic to be inserted.
- Select the
 Insert
Image action. The Insert Image dialog box appears.
Insert
Image action. The Insert Image dialog box appears.Figure 1: Insert Image Dialog Box 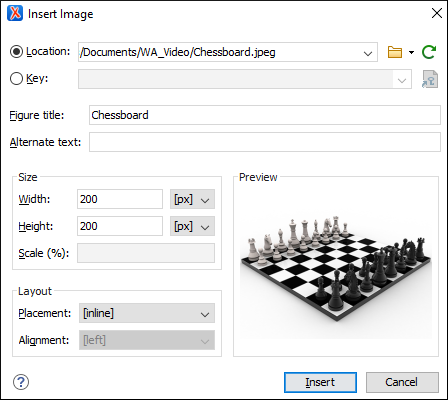
- Configure the options in this dialog box and click Insert.The Insert Image dialog box includes the following options and features for inserting images into a DITA document:
- Location
- Use this option to specify a URL for the image as the value of an
@hrefattribute inside the<image>element. You can type the URL of the image you want to insert or use browsing actions in the Browse drop-down menu (there is also a
history drop-down).
Browse drop-down menu (there is also a
history drop-down). - Key
- Use this option to insert the selected key as the value of a
@keyrefattribute inside the<image>element. All keys that are presented in the dialog box are gathered from the root map of the current DITA map. You can use the Choose Key Reference button to open
the Choose Key dialog box that presents the list of keys
available in the selected root map.Note: If your defined keys are not listed in this dialog box, it is most likely trying to gather keys from the wrong root map. You can change the root map by using the Change Root Map link in the Choose Key dialog box or change it in the Root map option in the toolbar of the DITA Maps Manager.
Choose Key Reference button to open
the Choose Key dialog box that presents the list of keys
available in the selected root map.Note: If your defined keys are not listed in this dialog box, it is most likely trying to gather keys from the wrong root map. You can change the root map by using the Change Root Map link in the Choose Key dialog box or change it in the Root map option in the toolbar of the DITA Maps Manager. - Figure title
- Use this text box to insert a
<title>and<image>element inside a<fig>element. - Alternate text
- Use this text box to insert an
<alt>element inside the<image>element. - Size
- Use this section to configure the Width and
Height of the image, or Scale the
image. Specifying a value in these options inserts a
@width,@height, and@scaleattribute, respectively. - Layout
- Use the options in this section to insert
@placementand@alignattributes into the<image>element. - Preview
- The Preview box shows a thumbnail of the selected image so that you can see a preview of the image before clicking Insert.
Adding an Image Inline with Drag/Drop (or Copy/Paste) Actions
You can drag images from your system explorer or the Project view and drop them
into a DITA document (or copy and paste). This will insert the path of the image file as the
value of the
@href attribute in a DITA <image>
element:<image href="../images/image_file.png"/>
Tip: To replace an image, just drag and drop a new image over the existing one. Oxygen XML Editor will automatically update the reference to the new image.
Adding an Image in a Figure Element
To add an image in a figure:
- Add a
<fig>element to your document at the appropriate place. - Add a
<title>and/or<desc>element to the<fig>element, according to your needs. - Add an
<image>element to the<fig>element.
Note: The
fig element has a number of other child elements that may be
appropriate to your content. See the DITA documentation for complete information about the
fig element.Note: The order that the content of the
<image>,
<title>, and <desc> elements will appear in
the output is determined by the output transformation. If you want to change how they
appear, you may have to modify the output transformation, rather than your source
content.