The Navigator view is designed to assist you with organizing and managing related files grouped in the same XML project. The actions available on the contextual menu and toolbar associated to this panel enable the creation of XML projects and shortcuts to various operations on the project documents.
Figure: The Navigator View
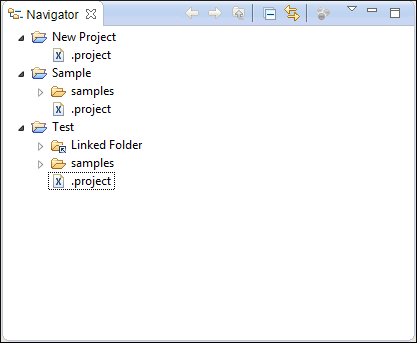
The following actions are grouped in the upper right corner:
 Collapse
All
Collapse
All- Collapses all project tree folders. You can also collapse/expand a project tree folder if you select it and press the Enter key or Left Arrow to collapse and Right Arrow to expand.
 Link with
Editor
Link with
Editor- When selected, the project tree highlights the currently edited file, if it is found
in the project files. Note: This button is disabled automatically when you move to the Debugger perspective.
- View Menu
- Drop-down menu that contains various settings.
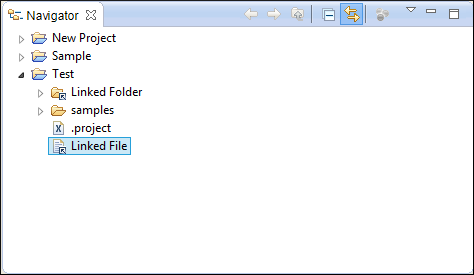
The files are usually organized in an XML project as a collection of folders. There are two types of resources displayed in the Navigator view:
- Physical folders and files - marked with the operating system-specific icon
for folders (usually a yellow icon on Windows and a blue icon on Mac OS X). These folders
and files are mirrors of real folders or files that exist in the local file system. They are
created or added to the project by using contextual menu actions (such
as and ).Also, the
contextual menu action
 Delete can be used to remove them from the project
and local file system.
Delete can be used to remove them from the project
and local file system. - Shortcut folders and files - the icons for
file and folder shortcuts are displayed with a shortcut symbol. They
are created and added by using the actions or from the contextual menu or File menu. Also, the
contextual menu action Delete can be used to remove them from the project
(the local file system remains unchanged).
Figure: The Navigator View with Examples of the Two Types of Resources
Creating New Projects
The following actions are
available by selecting New from the contextual menu or
File menu:
- Opens the New XML Project dialog box that allows you to create a new project and adds it to the project structure in the Navigator view.
- Opens the New sample XML project dialog box that allows you to customize sample resources in a new project and adds it to the project structure in the Navigator view.
Creating New Project Items
To create new project items,
select the desired document type or folder from the New menu of the
contextual menu, when invoked from the Navigator view (or from the
File menu). You can also create a document from a template by
selecting from the contextual menu.
- New >
 File
File - Opens a New file dialog box that helps you create a new file and adds it to the project structure.
- New >
 Folder
 - Opens a New Folder dialog box that allows you to specify a name for a new folder and adds it to the structure of the project.
- New >
 Logical Folder
 - Available when invoked from the project root, this action creates a logical
folder in the tree structure (the icon is a magenta folder on Mac OS X -
 ).
). - Available when invoked from the project root, this action replicates the structure of a remote folder accessible over FTP/SFTP/WebDAV, as a structure of logical folders. The newly created logical folders contain the file structure of the folder it points to.
Managing Project Content
Creating/Adding Files and Folders
You can create linked folders
(shortcuts) by dragging and dropping folders from the Windows Explorer / Mac OS X Finder
to the project tree, or by using the contextual menu from the location in the project tree
where you wanted it added and selecting . To create a file inside a linked folder, use the contextual menu and
select (you can use the Advanced button to link to a file
in the local file system).
Note: The linked folders presented in the
Navigator view are marked with a special icon.
You can create physical folders by selecting from the contextual menu.
When adding files to a project, the default target is the project root. To change a target, select a new folder. Files may have multiple instances within the folder system, but cannot appear twice within the same folder.
Removing Files and Folders
To remove one or
more files or folders, select them in the project tree and press the
Delete key, or select the contextual menu
action Delete.
Delete.CAUTION:
In most cases this action is
irreversible, deleting the file permanently. Under particular circumstances (if you are
running a Windows installation of Oxygen XML Developer plugin and the Recycle Bin is
active) the file is moved to Recycle Bin.
Moving Files and Folders
You can move the resources of the project with drag and drop operations on the files and folders of the tree.
You can also use the usual
 Copy and
 Paste
actions to move resources in the Navigator view.
Paste
actions to move resources in the Navigator view.
Renaming Files and Folders
There are two ways you can rename
an item in the Navigator view. Select the item in the
Navigator view and do one of the following:
- Invoke the Rename action from the contextual menu.
- Press F2 and type the new
name.
To finish editing the item name, press Enter.
Locating and Opening Files
If a project folder contains a lot of documents, a certain document can be located quickly in the project tree by selecting the folder containing the desired document and typing the first few characters of the document name. The desired document is automatically selected as soon as the typed characters uniquely identify its name in the folder.
The selected document can be opened by pressing the Enter key, by double-clicking it, or with one of the Open actions from the contextual menu. The files with known document types are opened in the associated editor, while binary files are opened with the associated system application. To open a file with a known document type in an editor other than the default one, use the Open with action. Also, dragging and dropping files from the project tree to the editor area results in the files being opened.
Saving the Project
The project file is automatically saved every time the content of the Navigator view is saved or modified by actions such as adding or removing files and drag and drop.
Validate Files
The currently selected files associated with the Oxygen XML Developer plugin in the Package Explorer view or in the Navigator view can be checked to be XML well-formed or validated against a schema (DTD, XML Schema, Relax NG, Schematron or NVDL) with one of the following contextual menu actions found in the Validate sub-menu:
- Validate >
 Check
Well-Formedness
Check
Well-Formedness - Checks if the selected file or files are well-formed.
 Validate
- Validates the selected file or files against their associated schema. EPUB files make an exception, because this action triggers a Validate and Check for Completeness operation.
- Validate with Schema
- Validates the selected file of files against a specified schema.
 Configure Validation Scenario(s)
- Allows you to configure and run a validation scenario.
- Validate >
 Clear
Validation Markers
Clear
Validation Markers - Clears all the error markers from the main editor and Problems view.
Applying Transformation Scenarios
The currently selected files associated with the Oxygen XML Developer plugin in the Package Explorer view or in the
Navigator view can be transformed in one step with one of
the following actions available from contextual menu in the Transform sub-menu:
- Transform >
 Apply
Transformation Scenario(s)
Apply
Transformation Scenario(s) - Obtains the output with one of the built-in scenarios.
- Transform >
 Configure Transformation Scenario(s)
 - Opens a dialog box that allows you to configure pre-defined transformation scenarios.
- Transform > Transform with
- Allows you to select a transformation scenario to be applied to the currently selected files.
Refactoring Actions (Available for certain document types (such as XML, XSD, and XSL)
Oxygen XML Developer plugin includes some refactoring operations that help you manage the structure of your documents. The following actions are available from the contextual menu in the Refactoring sub-menu:
- Allows you to change the name of a resource.
- Allows you to change the location on disk of a resource.
- Refactoring >
 XML
Refactoring
XML
Refactoring - Opens the XML Refactoring tool wizard that presents refactoring operations to assist you with managing the structure of your XML documents.
Other Contextual Menu Actions
Other actions that are available in the contextual menu from the project tree include:
- Open
- Opens the selected file in the editor.
- Open with submenu
- This submenu offers you choices for opening the selected file in various editors.
- Refresh
- Refreshes the content and the dependencies between the resources in the Master Files directory.
 XPath in
Files
XPath in
Files- Opens the XPath/XQuery Builder view that allows you to compose XPath and XQuery expressions and execute them over the currently edited XML document.
- Check Spelling in Files
- Allows you to check the spelling of multiple files.
 Format and
Indent Files
Format and
Indent Files- Opens the Format and Indent Files dialog box that allows you to configure the format and indent (pretty print) action that will be applied on the selected documents.
- Properties
- Displays the properties of the current file in a Properties dialog box.
