Administration PageHistory | Edit
Oxygen XML Web Author Component includes a user-friendly Administration Page that helps you to configure your instance of the Oxygen XML Web Author Component. You can use this page to configure a variety of settings. You need to enable the Administration Page before you can access it, but once you do, you can access it from a link on the top-right corner of the Dashboard page.
Enabling the Administration Page
If you used the Linux, Windows, or All Platforms installation kits, the administration page is already enabled.
- Edit the shiro-users.ini file located in the Oxygen Data
Directory.
- To define a user, use this
format:
user.USERNAME = PASSWORD,ROLE - To define a role, use this
format:
role.ROLENAME = PERMISSIONS
- To define a user, use this
format:
- Your Administration Page is now enabled. To access it, go to the following URL:
http://example.com:8080/oxygen-webapp/app/admin.html
where http://example.com:8080/oxygen-webapp is the URL of your instance of the Oxygen XML Web Author Component. - You will be prompted for authentication credentials and you will enter those configured in the steps above.
For information about resetting the admin credentials, see Resetting Admin Credentials.
Accessing the Administration Page
You can easily access the Administration page from a link on the Dashboard page.
Figure: Administration Page Link

How to Hide the Administration Page Link
You can hide the Administration Page link from regular users by deselecting the Show a link to the Administration Page option that is available in the Settings section of the Administration Page.
Figure: Show Administration Page Link Option
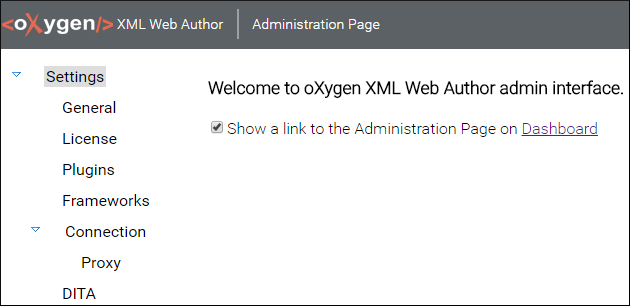
Administration Page Settings
- General
-
- Change tracking initial state
- Allows you the choose the initial state of the Change Tracking feature. You can choose between Stored in document, Always On, and Always Off.
- Show all possible elements in content completion list
- When enabled, the Content Completion Assistant includes all possible elements, including those that are invalid at the current location, but those proposals are rendered in a lighter shade of gray, italicized, and appear after the valid proposals.
- Logging
- This section displays the location of the Log file or Config file that Oxygen XML Web Author Component uses for logging purposes.
- Options
- This section displays the location of the Options file that Oxygen XML Web Author Component uses for various default settings.
- License
- Displays licensing information and allows you to configure a license server connection with Change Server and Manage Server buttons.
- Plugins
- Displays the various plugins for your Oxygen XML Web Author Component and allows you to add and configure them. It also includes an Upload plugin button for adding new ones to the list.
- Frameworks
- Displays the various frameworks for your Oxygen XML Web Author Component and allows you to add and configure them. It also includes an Upload framework button for adding new ones to the list.
- Connection
-
- Automatically accept a security certificate, even if invalid
- If enabled, security certificates are automatically accepted, regardless of their validity.
- Allows you to configure the proxy settings for your Oxygen XML Web Author Component.
- DITA
- Allows you to specify the default directory of the DITA Open Toolkit distribution
(bundled with the Oxygen XML Web Author Component installation) to be used for validating
and publishing DITA content. You can select from the following:
- Built-in DITA-OT 1.8
- If this is set, all defined DITA transformation scenarios will run with DITA-OT 1.8.
- Built-in DITA-OT 2.x (with support for DITA 1.3 and Lightweight DITA)
- All defined DITA transformation scenarios will run with DITA-OT 2.x. This also gives you access to DITA 1.3 and Lightweight DITA file templates when you create new documents.