Presenting Validation Errors in Text ModeHistory | Edit
Oxygen XML Editor can be configured to automatically validate documents while editing in the Text mode, and actions are also available to manually validate documents on-request.
- In the main editing pane, with the issue underlined in a color according to the type of issue.
- In the right-side vertical stripe, with a marker that is colored according to the type of issue.
- For attributes with detected issues, in the Attributes view, with the attribute and its value colored according to the type of issue.
- Validation Errors [Red] - By default, the underline in the editing pane, the marker in the right vertical stripe, and the foreground color of the attribute in the Attributes view are colored in red.
- Validation Warnings [Yellow] - By default, the underline in the editing pane, the marker in the right vertical stripe, and the foreground color of the attribute in the Attributes view are colored in yellow.
- Validation Info [Blue] - By default, the underline in the editing pane, the marker in the right vertical stripe, and the foreground color of the attribute in the Attributes view are colored in blue.
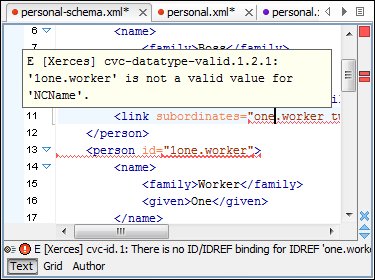
Hovering over a validation issue presents a tooltip message with more details about the problem and possible quick fixes (if available for that issue).
Figure: Presenting Validation Errors in Text Mode
- Upper Part of the Stripe
- A success indicator square will turn green if the validation is successful or only info messages are found, red if validation errors are found, or yellow if only validation warnings are found. More details about the issues are displayed in a tool tip when you hover over indicator square. If there are numerous problems, only the first three are presented in the tool tip.
- Middle Part of the Stripe
- Errors are depicted with red markers, warnings with yellow markers, and info message
with blue markers. If you want to limit the number of markers that are displayed, open the
Preferences dialog box , go to , and specify the desired limit in the Maximum number of validation highlights
option.
Clicking a marker will highlight the corresponding text area in the editor. The validation message is also displayed both in a tool tip (when hovering over the marker) and in the message area on the bottom of the editor panel (clicking the
 Document checking options button
opens the Document Checking preferences page.
Document checking options button
opens the Document Checking preferences page. - Bottom Part of the Stripe
- Two navigation arrows (
 ) allow you to jump to
the next or previous issue. The same actions can be triggered from (Ctrl + Period
(Command + Period on OS X)) and (Ctrl + Comma
(Command + Comma on OS X)). Also, the
) allow you to jump to
the next or previous issue. The same actions can be triggered from (Ctrl + Period
(Command + Period on OS X)) and (Ctrl + Comma
(Command + Comma on OS X)). Also, the  button can be used to clear
all the validation markers.
button can be used to clear
all the validation markers.
Status messages from every validation action are also logged in the Information view.
If you want to see all the validation messages grouped in the
Results
panel, you should use
the  Validate action from the toolbar or menu..