You can insert symbols by using the Character Map dialog box that can
be opened with the Edit >  Insert
from Character Map action.
Insert
from Character Map action.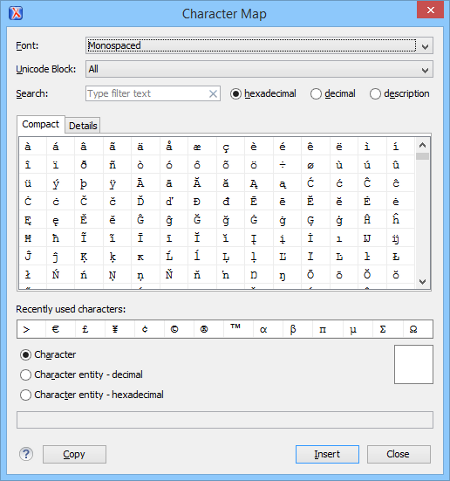
Insert
from Character Map action.Figure: The Character Map Dialog Box
The Character Map dialog box allows you to visualize all characters
that are available in a particular font, pick the character you need, and insert it in the
document you are editing. It includes the following fields and sections:
- Font
- Use this drop-down list to choose the font for which you want to display characters.
- Unicode Block
- Use this drop-down list to only see a certain range of characters. This will filter the number of characters displayed, showing only a contiguous range of characters corresponding to the selected block. Unassigned characters are displayed as empty squares.
- Search
- Use this filter to search for a character by one of the following attributes:
- hexadecimal
- decimal
- descriptionNote: Selecting the description option opens the Details tab. If you enter a character description in the Search field, the description option is selected automatically.
- Character Table Section
- The characters that are available to be inserted are listed in two tabs:
- Compact - Matrix-like table that displays a visual representation of the characters.
- Details - Displays the available characters in a tabular format, presenting their decimal and hexadecimal value along with their description.
- Recently Used Characters Section
- Displays the symbols that you have used recently and you can also select one from there to insert it in the current document.
- Character Mode Section
- The next section of the dialog box allows you to select how you want the character to
appear in your document. You can choose between the following:
- Character
- Character entity - decimal
- Character entity - hexadecimal
- You can see the character or code that will be inserted in your document next to the selections in this section. You can also see the name and range name of a character either at the bottom of the dialog box, or in a tooltip when hovering the cursor over the character.
Press the Insert button to insert the selected character in the current editor at cursor position. You will see the character in the editor if the editor font is able to render it. The Copy button copies it to the clipboard without inserting it in the editor.
